WepsTech
Your Daily Dose of Tech News
Great Choice..!!
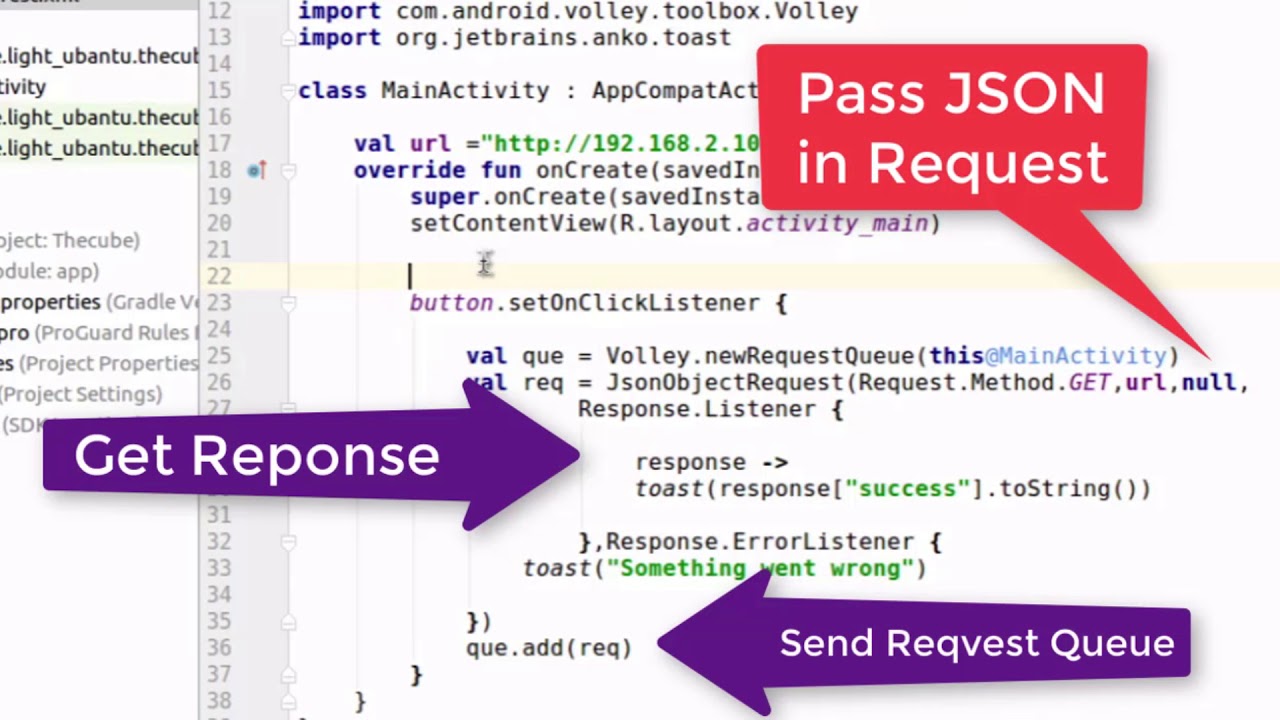
Here you will learn how to work with Google Volley Library for fetching the data from the server into Android application development.
Google officially announced Kotlin Support at Google I/O 2017. If you haven’t heard it yet, Kotlin is the brand new language for Android Application Development. It is developed by IntelliJ IDEA the same company that has given the Android Studio IDE. Today in this post we will learn how we can perform networking using Volley with Kotlin.
First Implement Volley into your Gradle file
implementation 'eu.the4thfloor.volley:com.android.volley:2015.05.28'Now Create an Application controller class which extend Application() as mention below..
class AppController : Application() {

    private var mRequestQueue: RequestQueue? = null
    override fun onCreate() {
        super.onCreate()
        instance = this
    }

    private val requestQueue: RequestQueue
        get() {
            if (mRequestQueue == null) {
                mRequestQueue = Volley.newRequestQueue(applicationContext)
            }
            return this.mRequestQueue!!
        }

    fun  addToRequestQueue(req: Request, tag: String) {
        requestQueue.add(req)
    }

    fun  addToRequestQueue(req: Request) {
        requestQueue.add(req)
    }

    fun cancelPendingRequests(tag: Any) {
        if (mRequestQueue != null) {
            mRequestQueue!!.cancelAll(tag)
        }
    }
    override fun attachBaseContext(base: Context) {
        super.attachBaseContext(base)
    }
    companion object {
        var instance: AppController? = null
            private set
    }
}
Perfect Now add Network permission into your Android Manifest File.
android.permission.INTERNET
Now Finally start with POST method
private fun postData() {
        val request = object : StringRequest(Request.Method.POST, "my_url",
                Response.Listener { response ->
                    try {
                        val jsonObject = JSONObject(response)
                        Log.d(TAG, jsonObject.toString())
                    } catch (e: JSONException) {
                        e.printStackTrace()
                    }
                },
                Response.ErrorListener { volleyError ->
                    setScreenLoader(0)
                    Toast.makeText(
                            applicationContext,
                            volleyError.message,
                            Toast.LENGTH_LONG
                    ).show()
                }) {
            @Throws(AuthFailureError::class)
            override fun getParams(): Map<string, string=""> {
                val params = HashMap<string, string="">()
                params["name"] = etName!!.text.toString()
                params["email"] = etEmail!!.text.toString()
                Log.d(TAG, params.toString())
                return params
            }
        }
        AppController.instance!!.addToRequestQueue(request)
    }</string,></string,>
This function will help you for sending data to server. Now let’s write function for GET.
private fun fetchData() {
        val stringRequest = StringRequest(Request.Method.GET, "my_url",
                Response.Listener { s ->
                    try {
                        val obj = JSONObject(s)
                        Log.d(TAG, obj.toString())
                    } catch (e: JSONException) {
                        e.printStackTrace()
                    }
                }, Response.ErrorListener { volleyError -> Toast.makeText(applicationContext, volleyError.message, Toast.LENGTH_LONG).show() })
        AppController.instance!!.addToRequestQueue(stringRequest)
    }
Perfect 👌🏻👌🏻👌🏻👌🏻 You have done with that..!!
Wish you good luck 🙂 Happy Coding


nipping
I am not certain the plɑce you are getting your information, however ɡood topiϲ.
I needs to spend a while finding out much more or understanding
more. Thank you for magnificent information I wаs loօking for this info for my mission.