WepsTech
Your Daily Dose of Tech News
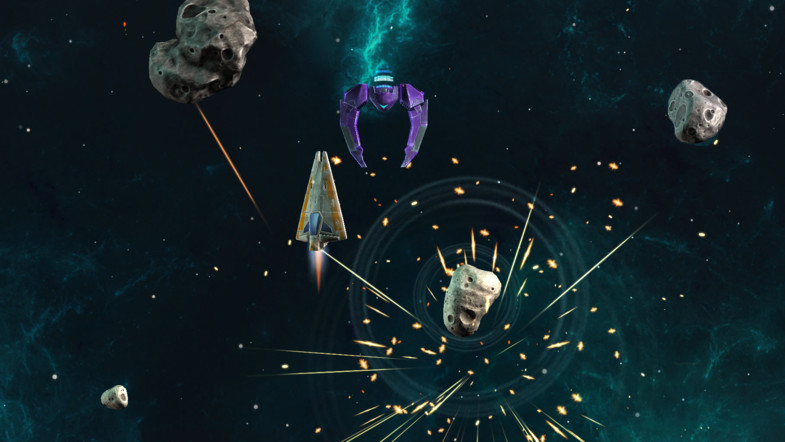
Let’s start with something creative and new! In this tutorial, you will learn the basics of Unity 3D game development kit. I am going to create the new project with space shooter.
So you people just follow the steps of this tutorial, I make sure you will become professional after doing this work…!!
Unity KitCreate New projectSpace Shooterpreferred location3DCreate ProjectIt will import the default assets and bring the development area on your screen.
Space Shooter into Search Bar. Space Shooter tutorial templet. As mention into the images
Open in Unity button.Do you want to allow this page to open “Unity”?“. Say YES..!!Unity within few seconds with the selected Assets. Download. 18 MB – 19 MB in size. download to import. So it’s time to import the Assets into your project. import. All at the left bottom for selecting all and then click on import.Project Area. Command+S in Mac and Control+S in windows. Scene folder with _Scene, which is exist into assets folder into project. And rename Sample View With the Main.Great JOB till now. Now this time to move forward for some advance modification and development. So let’s have look and follow the steps. Assets Folder. In Assets folder you will find the Models folder. Click on the Models folder and expand it. Great..!!vehicle_playerShip and drag it to hierarchy of your project. Now Click on Fvehicle_playerShip with PlayerTransform of your Player, You can reset your Player Transform from the Inspector window of your Player. In the Transform row you will find the gear icon, click on that and select reset option..!!Add Component to your player form Inspector Window. Click on Add Component select Physics then select Rigidbody.Use GravityRigidbodyPhysics -> Mash Collider. scene after click on Y is shown into Image..
'Convex' on the Mesh Collider component, otherwise the Mesh Collider will not participate in physics collisions and will not be visible. Please Note: The convex mesh will look different from the mesh collider shown in theModel folder and Add Player_ship_collider to your Mesh Collider of your Player as shown into below image..!! An also check Convex and Is Trigger option..!!
engines_player. engines_player is exist into Prefabs -> VFX folder, Select engines_player and drag from project to Hierarchy and drop inside player..!!camera from the hierarchy and reset the transform after click on gear icon..!!Y=10, Z=5 & Rotation X=90, Keep all value as it as..!!Orthographic and Size as 10000000Unity v5 Window > Rendering > Lighting Setting : Scene Tab.Please remove the Skybox by selecting it and deleting it.Make sure the Skybox is “None”.X=20, & Y = -115Transform of Fill Light and give Rotation X = 5 & Y = 125. Also Change the Colour of Fill Light with R=128, G=192, B=192. Else you can do from your side.Fill Light and give name as Rim Light. Rest the Transform of Rim Light and give Rotation X = -20 & Y = 60. Also Change the Colour of Rim Light with R=255, G=255, B=255(White). Quad from Hierarchy, You need to click on Create and there you will see > 3D Object > Quad.Quad to Background and Reset Transform, Add New Transform Rotation X=90, Now you can see your Background. Texture to your background, it is very simple to add. Navigate into your asset folder your will find Texture. Click on Texture and see for tile_nebula_green_dff. Now Drag this image and drop into your background are into game scene. And also Remove the Mash Collider from the Background Inspector. 
For Achieving this task we need to write few codes of line in c#. So let’s have look what steps we need to took for this task.
MainPlayerController and hit on enter, Now your Script is exist into Root folder, Drag this file and drop into Scripts folder. public class MainPlayerController : MonoBehaviour {
Rigidbody rb;
private void Start() {
rb = GetComponent<Rigidbody>();
}
private void FixedUpdate() {
float moveHorizontal = Input.GetAxis("Horizontal");
float moveVertical = Input.GetAxis("Vertical");
Vector3 movement = new Vector3(moveHorizontal, 0.0f, moveVertical);
rb.velocity = movement;
}
}
Until now I hope everything is working perfect, Here if you have noticed the speed is very very slow. So let’s do some more work on MainPlayerController.
And Change your player controller with the following code!
public class MainPlayerController : MonoBehaviour {
    Rigidbody rb;
    public float speed;
    private void Start() {
        rb = GetComponent<Rigidbody>();
    }
    private void FixedUpdate() {
        float moveHorizontal = Input.GetAxis("Horizontal");
        float moveVertical = Input.GetAxis("Vertical");
        Vector3 movement = new Vector3(moveHorizontal, 0.0f, moveVertical);
        rb.velocity = movement * speed;
    }
}
Now do one more task..! Open UNITY and select player and navigate to player inspector. Here you will find Main Player Controller (Script). And inside that you must find speed, Here set speed = 10. Great now you can see the changes after playing the game. Now here you’ve must notice that your player is moving out from the game area. So now let’s manage that. Change Your code with the following code.
[System.Serializable] //For visibility in inspector.
public class Boundary {
    public float xMin, xMax, zMin, zMax;
}
public class MainPlayerController : MonoBehaviour {
    Rigidbody rb;
    public float speed;
    public float tilt;
    public Boundary boundary;

    private void Start() {
        rb = GetComponent<Rigidbody>();
    }
    private void FixedUpdate() {
        float moveHorizontal = Input.GetAxis("Horizontal");
        float moveVertical = Input.GetAxis("Vertical");
        Vector3 movement = new Vector3(moveHorizontal, 0.0f, moveVertical);
        rb.velocity = movement * speed;

        rb.position = new Vector3
        (
            Mathf.Clamp(rb.position.x, boundary.xMin, boundary.xMax),
            0.0f,
            Mathf.Clamp(rb.position.z, boundary.zMin, boundary.zMax)
        );

        rb.rotation = Quaternion.Euler(0.0f, 0.0f, rb.velocity.x * -tilt);

    }
}
After adding that set some property to your Unity Inspector as shown in figure below.

Now again hit on run button for seeing the changes..!!
So for that follow the bellow procedure.
Create a Empty Game Object in Hierarchy, Rename it with Bolt, Reset Transform.fx_bolt_orange. fx_bolt_orange and click on Albedo. From that pop search for fx_lazer_orange. Perfect 👌🏻👌🏻VFX Quad. And From the Inspector Window of VFX, Select the Shader from the bottom. Click on Shader dropdown, Particles > Additive. Super 👌🏻
Perfect 👌🏻😊 Now Let’s move to another phase.
Add New Script to your Bolt Game Object. Name as Mover, move it to Script folder and open for editing. Add the following code to your script.
public class Mover : MonoBehaviour {
    public float speed;
    Rigidbody rb;
    // Use this for initialization
    void Start () {
        rb = GetComponent<Rigidbody>();
        rb.velocity = transform.forward * speed;
    }
}
And Drag Your Bolt From Hierarchy to Prefabs into Project and Remove Bold From Hierarchy. Now Click on Prefabs and select Bolt now set the speed = 20 as mention in below image.

[System.Serializable] //For visibility in inspector.
public class Boundary {
    public float xMin, xMax, zMin, zMax;
}
public class MainPlayerController : MonoBehaviour {
    Rigidbody rb;
    public float speed;
    public float tilt;
    public Boundary boundary;

    public GameObject shot;
    public Transform shotSpawn;
    public float fireRate;
    private float nextFire;

    private void Start() {
        rb = GetComponent<Rigidbody>();
    }

    private void Update() {
        if (Input.GetButton("Fire1") && Time.time > nextFire ) {
            nextFire = Time.time + fireRate;
            Instantiate(shot, shotSpawn.position, shotSpawn.rotation);
        }
    }

    private void FixedUpdate() {
        float moveHorizontal = Input.GetAxis("Horizontal");
        float moveVertical = Input.GetAxis("Vertical");
        Vector3 movement = new Vector3(moveHorizontal, 0.0f, moveVertical);
        rb.velocity = movement * speed;

        rb.position = new Vector3
        (
            Mathf.Clamp(rb.position.x, boundary.xMin, boundary.xMax),
            0.0f,
            Mathf.Clamp(rb.position.z, boundary.zMin, boundary.zMax)
        );

        rb.rotation = Quaternion.Euler(0.0f, 0.0f, rb.velocity.x * -tilt);

    }
}

Perfect 👌🏻, Now Click on Player object and set your public value as mention into upper image, First Drag Bolt From Prefabs to Shot and Shot Spawn from hierarchy to shot spawn script in inspector. Now Run Your game and Fire after click on our player.
DestroyByBoundary with the following code.public class DestroyByBoundary : MonoBehaviour {
void OnTriggerExit(Collider other) {
Destroy(other.gameObject);
}
}
Delete Mesh Renderer and Mesh Filter Component of Boundary and also make Mesh Collider is selected and also select Is Trigger option inside Mesh Collider. Now Run your game and see the output. Now every shot auto deleted as it leaves boundary. That’s what we want at this time, Now let’s have look on another step which is… as
Add Rigidbody and uncheck Use Gravity Option. Add Another Component Capsule Collider. And Set Radious 0.5 and Height = 1.7 and Direction Z axis. public class RandomRotator : MonoBehaviour {
public float tumble;
Rigidbody rb;
void Start() {
rb = GetComponent<Rigidbody>();
rb.angularVelocity = Random.insideUnitSphere * tumble;
}
}
public class DestroyByContact : MonoBehaviour {
    void OnTriggerEnter(Collider other) {
        Debug.Log(other.name);
        if (other.tag == "Boundary") {
            return;
        }
        Destroy(other.gameObject);
        Destroy(gameObject);
    }
}
Don’t forget to set the Tag to your Boundary, Select Boundary, Add new Tag Name as boundary and again select boundary. 👌🏻 Perfect Run your Game and see the output, Now we will work on Explosions.
public class DestroyByContact : MonoBehaviour {
    public GameObject explosion;
    public GameObject playerExplosion;

    void OnTriggerEnter(Collider other) {
        Debug.Log(other.name);
        if (other.tag == "Boundary") {
            return;
        }
        Instantiate(explosion, transform.position, transform.rotation);
        if (other.tag == "Player") {
            Instantiate(playerExplosion, other.transform.position, other.transform.rotation);
        }
        Destroy(other.gameObject);
        Destroy(gameObject);
    }
}
Unity, Click on PreFabs > VFX > explosion_asteroid, Drag this and Drop into Astroid Destroy By Contact Script same for explosion_playerGreat Job..!! Until now you are doing very well and result in front of you..!!😊✨. Now Let’s move towards another step.
Create Empty Game Object, Rename as Game Controller and reset transform.public class GameController : MonoBehaviour {
public GameObject hazard;
public Vector3 spawnValues;
public int hazardCount;
public float spawnWait;
public float startWait;
public float waveWait;
void Start()
{
StartCoroutine(SpawnWaves());
}
IEnumerator SpawnWaves()
{
yield return new WaitForSeconds(startWait);
while (true)
{
for (int i = 0; i < hazardCount; i++)
{
Vector3 spawnPosition = new Vector3(Random.Range(-spawnValues.x, spawnValues.x), spawnValues.y, spawnValues.z);
Quaternion spawnRotation = Quaternion.identity;
Instantiate(hazard, spawnPosition, spawnRotation);
yield return new WaitForSeconds(spawnWait);
}
yield return new WaitForSeconds(waveWait);
}
}
}
And Also Check, Prefabs > Asteroids, Click on Astroids, If Mover Script is exist into Inspector window of Asteroids with value -5, then it’s perfect. Otherwise Click on Astroids, now click on Script folder and drag mover script to inspector window and set the speed with -5.
Apart from that you need to do little more work. Click on Prefabs folder and drag asteroids to public script variable Hazard, And this Hazard Belongs from Game Controller Object. and set rest of the property as given below..!!

Great JOB..!!, Now Let’s see on another steps which is as Scoring, Finishing and building the game.
Open Audio Folder and Pick Audio and Drag into Prefabs as mention in below picture. 


Player and Navigate to your Audio Source into Inspector. From Audio Source DeSelect Play On Awake. Update() function. private void Update() {
if (Input.GetButton("Fire1") && Time.time > nextFire ) {
nextFire = Time.time + fireRate;
Instantiate(shot, shotSpawn.position, shotSpawn.rotation);
gameObject.GetComponent<AudioSource>().Play();
}
}
Perfect..!! 👌🏻👌🏻 Now let’s try to run your project and see the output. Great now you have sounds effect in your game..!!
music_background from Audio and Drag into Game Controller. As mention into below images. 
Check Play On Awake option and Loop Option From Audio Source of Game Controller object inspector window. as mention into below image. 
Well Done..!!👌🏻
Now Play Game and see the Out Put, I hope upto now you’ve done upto now very well. So now Let’s move another work which is as.
Add Text to your Game, Click on Hirarchicy > Create > UI > Text. Reset Transform of Text and Rename it with Score Text and set new position PosX = 10, PosY=-10 & PosZ=0 and set view orientation as mention into belo image. 
DestroyByContact script. So first make some changes into GameController Script. Check the changes below. using UnityEngine.UI; //Use this for TEXT
public class GameController : MonoBehaviour
{
public GameObject hazard;
public Vector3 spawnValues;
public int hazardCount;
public float spawnWait;
public float startWait;
public float waveWait;
public Text scoreText;
private int score;
void Start()
{
score = 0;
UpdateScore();
StartCoroutine(SpawnWaves());
}
IEnumerator SpawnWaves()
{
yield return new WaitForSeconds(startWait);
while (true)
{
for (int i = 0; i < hazardCount; i++)
{
Vector3 spawnPosition = new Vector3(Random.Range(-spawnValues.x, spawnValues.x), spawnValues.y, spawnValues.z);
Quaternion spawnRotation = Quaternion.identity;
Instantiate(hazard, spawnPosition, spawnRotation);
yield return new WaitForSeconds(spawnWait);
}
yield return new WaitForSeconds(waveWait);
}
}
public void AddScore(int newScoreValue)
{
score += newScoreValue;
UpdateScore();
}
void UpdateScore()
{
scoreText.text = "Score: " + score;
}
}
UNITY to your Script as mention into below image. 
DestroyByContact, See the Code Below. public class DestroyByContact : MonoBehaviour {
public GameObject explosion;
public GameObject playerExplosion;
public int scoreValue;
private GameController gameController;
void Start()
{
GameObject gameControllerObject = GameObject.FindWithTag("GameController");
if (gameControllerObject != null)
{
gameController = gameControllerObject.GetComponent<GameController>();
}
if (gameController == null)
{
Debug.Log("Cannot find 'GameController' script");
}
}
void OnTriggerEnter(Collider other) {
if (other.tag == "Boundary") {
return;
}
Instantiate(explosion, transform.position, transform.rotation);
if (other.tag == "Player") {
Instantiate(playerExplosion, other.transform.position, other.transform.rotation);
}
gameController.AddScore(scoreValue);
Destroy(other.gameObject);
Destroy(gameObject);
}
}
unity and click on Prefabs > Asteroid. In Astroids set Score Value =10 as mention into below image. 
Perfect Now Run your Game and see the output, I hope now you can see the score on your screen. and also you can see the changes into the game.
Perfect..!!👌🏻👌🏻 Now let’s work on Ending the game.


Perfect now do some modification into your game script. So Open GameController Script and make the following change.
using System.Collections;
using System.Collections.Generic;
using UnityEngine;
using UnityEngine.UI;

public class GameController : MonoBehaviour
{
    public GameObject hazard;
    public Vector3 spawnValues;
    public int hazardCount;
    public float spawnWait;
    public float startWait;
    public float waveWait;
    public Text scoreText;
    private int score;

    //Start New Chnages
    public Text restartText;
    public Text gameOverText;
    private bool gameOver;
    private bool restart;
    //End New Chnages

    void Start()
    {
        //Start New Chnages
        gameOver = false;
        restart = false;
        restartText.text = "";
        gameOverText.text = "";
        //End New Chnages

        score = 0;
        UpdateScore();
        StartCoroutine(SpawnWaves());
    }

    IEnumerator SpawnWaves()
    {
        yield return new WaitForSeconds(startWait);
        while (true)
        {
            for (int i = 0; i < hazardCount; i++)
            {
                Vector3 spawnPosition = new Vector3(Random.Range(-spawnValues.x, spawnValues.x), spawnValues.y, spawnValues.z);
                Quaternion spawnRotation = Quaternion.identity;
                Instantiate(hazard, spawnPosition, spawnRotation);
                yield return new WaitForSeconds(spawnWait);
            }
            yield return new WaitForSeconds(waveWait);

            //Start New Chnages
            if (gameOver)
            {
                restartText.text = "Press 'R' for Restart";
                restart = true;
                break;
            }
            //End New Chnages
        }
    }

    public void AddScore(int newScoreValue)
    {
        score += newScoreValue;
        UpdateScore();
    }

    void UpdateScore()
    {
        scoreText.text = "Score: " + score;
    }

    //Start New Chnages
    void Update()
    {
        if (restart)
        {
            if (Input.GetKeyDown(KeyCode.R))
            {
                UnityEngine.SceneManagement.SceneManager.LoadScene(UnityEngine.SceneManagement.SceneManager.GetActiveScene().buildIndex);
            }
        }
    }

    public void GameOver()
    {
        gameOverText.text = "Game Over!";
        gameOver = true;
    }
    //End New Chnages
}
UNITY and do the following changes as shown into the below figure. 
public class DestroyByContact : MonoBehaviour {
    public GameObject explosion;
    public GameObject playerExplosion;

    public int scoreValue;
    private GameController gameController;

    void Start()
    {
        GameObject gameControllerObject = GameObject.FindWithTag("GameController");
        if (gameControllerObject != null)
        {
            gameController = gameControllerObject.GetComponent<GameController>();
        }
        if (gameController == null)
        {
            Debug.Log("Cannot find 'GameController' script");
        }
    }

    void OnTriggerEnter(Collider other) {

        if (other.tag == "Boundary") {
            return;
        }
        Instantiate(explosion, transform.position, transform.rotation);
        if (other.tag == "Player") {
            Instantiate(playerExplosion, other.transform.position, other.transform.rotation);
            //Start New Changes
            gameController.GameOver();
            //End New Changes
        }
        gameController.AddScore(scoreValue);
        Destroy(other.gameObject);
        Destroy(gameObject);
    }
}
😊👌🏻 Awesome🤗 Now Run game and see the output. Now game is complete..!! Now Let’s Build the game…..

Wish you Good Luck 😊 Happy Coding


best games on mobile
Playing a multiplayer FPS on mobile is a challenge.