WepsTech
The world of development
Hey, Guys welcome to this tutorial. In this complete video, I will make you understand the quick trick for Driver movement in User Application in Android with Kotlin. Like Uber, Zomato, Swiggy, Ola Android with Kotlin. And this is a simple way to achieve our goals. Through this simple video tutorial, you can learn more interesting things about the Driver movement in User Application. Like Uber, Zomato, Swiggy, Ola Android with Kotlin. In this video tutorial, you can learn the basics of the Custom marker, Driver movement in User Application. Like Uber, Zomato, Swiggy, Ola Android with Kotlin.
And you can create a beautiful Android application. And also you can get the answer of how to Driver move in User Application. Like Uber, Zomato, Swiggy, Ola Android with Kotlin. So watch the complete video. And if you watched the complete video then do not forget to give your suggestion in the comment box. Because your feedback & suggestions do matter for me 😊😊😊😊👇🏻
And finally, I would like to say that, If you like this video and it’s helpful for your project then click on the like button and do not forget to subscribe to this YouTube channel for future updates. This tutorial hardly take 1 hour to understand and integrating the complete flow in both android application. So first understand from the video and then use the following code.
Grate, I hope You have seen the entire video and You must also like the video. So at the very first I am writing the code for the driver application.
At the very first add the following permissions in your AndroidManifest.xml file.
    <uses-permission android:name="android.permission.INTERNET" />
    <uses-permission android:name="android.permission.ACCESS_FINE_LOCATION" />
    <uses-permission android:name="android.permission.ACCESS_COARSE_LOCATION" />
    <uses-permission android:name="android.permission.FOREGROUND_SERVICE" />
Grate after that create the following service file as mentioned in above video.
package com.pushpendra.services

import android.Manifest
import android.app.NotificationChannel
import android.app.NotificationManager
import android.app.Service
import android.content.Context
import android.content.Intent
import android.content.pm.PackageManager
import android.location.Location
import android.location.LocationListener
import android.os.Build
import android.os.IBinder
import android.os.Looper
import android.util.Log
import androidx.core.app.ActivityCompat
import androidx.core.app.NotificationCompat
import com.google.android.gms.location.*
import com.google.android.gms.location.LocationServices.getFusedLocationProviderClient
import com.google.firebase.database.DatabaseReference
import com.google.firebase.database.FirebaseDatabase
import com.pushpendra.driver.R
import com.pushpendra.models.MyLocation
import java.util.*


class DLLocationListener : Service(), LocationListener {

    private val TAG = "DL_LOCATION"

    private var location: Location? = null

    private var locationRequest: LocationRequest? = null


    private var dbRef: DatabaseReference? = null


    override fun onBind(p0: Intent?): IBinder? {
        return null
    }

    override fun onCreate() {
        super.onCreate()

        dbRef = FirebaseDatabase.getInstance().reference

        if (Build.VERSION.SDK_INT >= 26) {
            val CHANNEL_ID = "smt_location"
            val channel = NotificationChannel(
                CHANNEL_ID,
                getString(R.string.app_name) + " using your location",
                NotificationManager.IMPORTANCE_DEFAULT
            )
            (Objects.requireNonNull(getSystemService(Context.NOTIFICATION_SERVICE)) as NotificationManager).createNotificationChannel(
                channel
            )
            val notification =
                NotificationCompat.Builder(this, CHANNEL_ID)
                    .setContentTitle("")
                    .setContentText("").build()
            startForeground(1, notification)
        }
    }

    override fun onStartCommand(intent: Intent?, flags: Int, startId: Int): Int {
        startLocationUpdate()
        return super.onStartCommand(intent, flags, startId)
    }


    private fun startLocationUpdate() {
        locationRequest = LocationRequest()
        locationRequest?.priority = LocationRequest.PRIORITY_HIGH_ACCURACY
        locationRequest?.interval = 5000
        locationRequest?.fastestInterval = 2500

        val builder = LocationSettingsRequest.Builder()
        locationRequest?.let { locReq ->
            builder.addLocationRequest(locReq)
            val locationSettingRequest = builder.build()

            val locationSetting = LocationServices.getSettingsClient(this)

            if (ActivityCompat.checkSelfPermission(this, Manifest.permission.ACCESS_FINE_LOCATION)
                == PackageManager.PERMISSION_GRANTED
                && ActivityCompat.checkSelfPermission(
                    this,
                    Manifest.permission.ACCESS_COARSE_LOCATION
                )
                == PackageManager.PERMISSION_GRANTED
            ) {
                getFusedLocationProviderClient(this).requestLocationUpdates(
                    locReq,
                    object : LocationCallback() {
                        override fun onLocationResult(p0: LocationResult?) {
                            p0?.lastLocation?.let { lastLocation ->
                                onLocationChanged(lastLocation)
                            }
                        }
                    },
                    Looper.getMainLooper()
                )
            }
        }

    }

    override fun onLocationChanged(p0: Location) {
        Log.d(TAG, "onLocationChanged:${p0.latitude}, ${p0.longitude}")
        val myLocation = MyLocation(latitude = p0.latitude, longitude = p0.longitude)
        dbRef?.child("driver_points")?.setValue(myLocation)
    }
}
Wonderful, After that add one line of code in your AndroidManifest.xml file for activating the Location service.
    <application
        .......
        <service android:name="com.pushpendra.services.DLLocationListener" />
        ......
    </application>
Now at second last create the following class model as mention into the video tutorial.
package com.pushpendra.models

import com.google.firebase.database.IgnoreExtraProperties

@IgnoreExtraProperties
data class MyLocation(
    var latitude: Double? = null,
    var longitude: Double? = null
)
Grate Job! Now add finally add the following dependency and add your project with Firebase Console
    implementation 'com.google.android.gms:play-services-location:17.1.0'
    implementation platform('com.google.firebase:firebase-bom:25.12.0')
    implementation 'com.google.firebase:firebase-database-ktx'
I hope, You have follow the above video and you have done with the driver basic application. Rest of the code is depend upon the requirement. Now Let’s see the User application
First match with AndroidManifest.xml file as already defined in the above video.
<?xml version="1.0" encoding="utf-8"?>
<manifest xmlns:android="http://schemas.android.com/apk/res/android"
    package="com.pushpendra.user">

    <uses-permission android:name="android.permission.INTERNET" />

    <application
        android:allowBackup="true"
        android:icon="@mipmap/ic_launcher"
        android:label="@string/app_name"
        android:roundIcon="@mipmap/ic_launcher_round"
        android:supportsRtl="true"
        android:theme="@style/Theme.User">
        <activity android:name=".MainActivity">
            <intent-filter>
                <action android:name="android.intent.action.MAIN" />

                <category android:name="android.intent.category.LAUNCHER" />
            </intent-filter>
        </activity>

        <meta-data
            android:name="com.google.android.gms.version"
            android:value="@integer/google_play_services_version" />

        <meta-data
            android:name="com.google.android.geo.API_KEY"
            android:value="@string/google_maps_key" />
    </application>

</manifest>
Grate, After that add the following dependency in your build.gradel and also do not forget to add the firebase to your application.
    implementation 'com.google.android.gms:play-services-location:17.1.0'
    implementation platform('com.google.firebase:firebase-bom:25.12.0')
    implementation 'com.google.firebase:firebase-database-ktx'
    implementation 'com.google.android.gms:play-services-maps:17.0.0'
Grate Job 😊😊, After that check and MainActivity.kt code, Which is main Important in the entire example. And do not forget to follow the video.
package com.pushpendra.user
import androidx.appcompat.app.AppCompatActivity
import android.os.Bundle
import android.os.Handler
import android.os.Looper
import android.os.SystemClock
import android.util.Log
import android.view.animation.LinearInterpolator
import com.google.android.gms.maps.CameraUpdateFactory
import com.google.android.gms.maps.GoogleMap
import com.google.android.gms.maps.SupportMapFragment
import com.google.android.gms.maps.model.BitmapDescriptorFactory
import com.google.android.gms.maps.model.LatLng
import com.google.android.gms.maps.model.Marker
import com.google.android.gms.maps.model.MarkerOptions
import com.google.firebase.database.DataSnapshot
import com.google.firebase.database.DatabaseError
import com.google.firebase.database.FirebaseDatabase
import com.google.firebase.database.ValueEventListener
import org.json.JSONObject
import kotlin.math.atan2
import kotlin.math.cos
import kotlin.math.sin
class MainActivity : AppCompatActivity() {
private var mapFragment: SupportMapFragment? = null
private var googleMap: GoogleMap? = null
private val TAG: String = "MAIN_ACTIVITY"
private var driverMarker: Marker? = null
override fun onCreate(savedInstanceState: Bundle?) {
super.onCreate(savedInstanceState)
setContentView(R.layout.activity_main)
mapFragment =
supportFragmentManager.findFragmentById(R.id.google_map_order_track) as SupportMapFragment?
mapFragment?.getMapAsync { googleMap ->
this.googleMap = googleMap
listenLocationOfDriver()
}
}
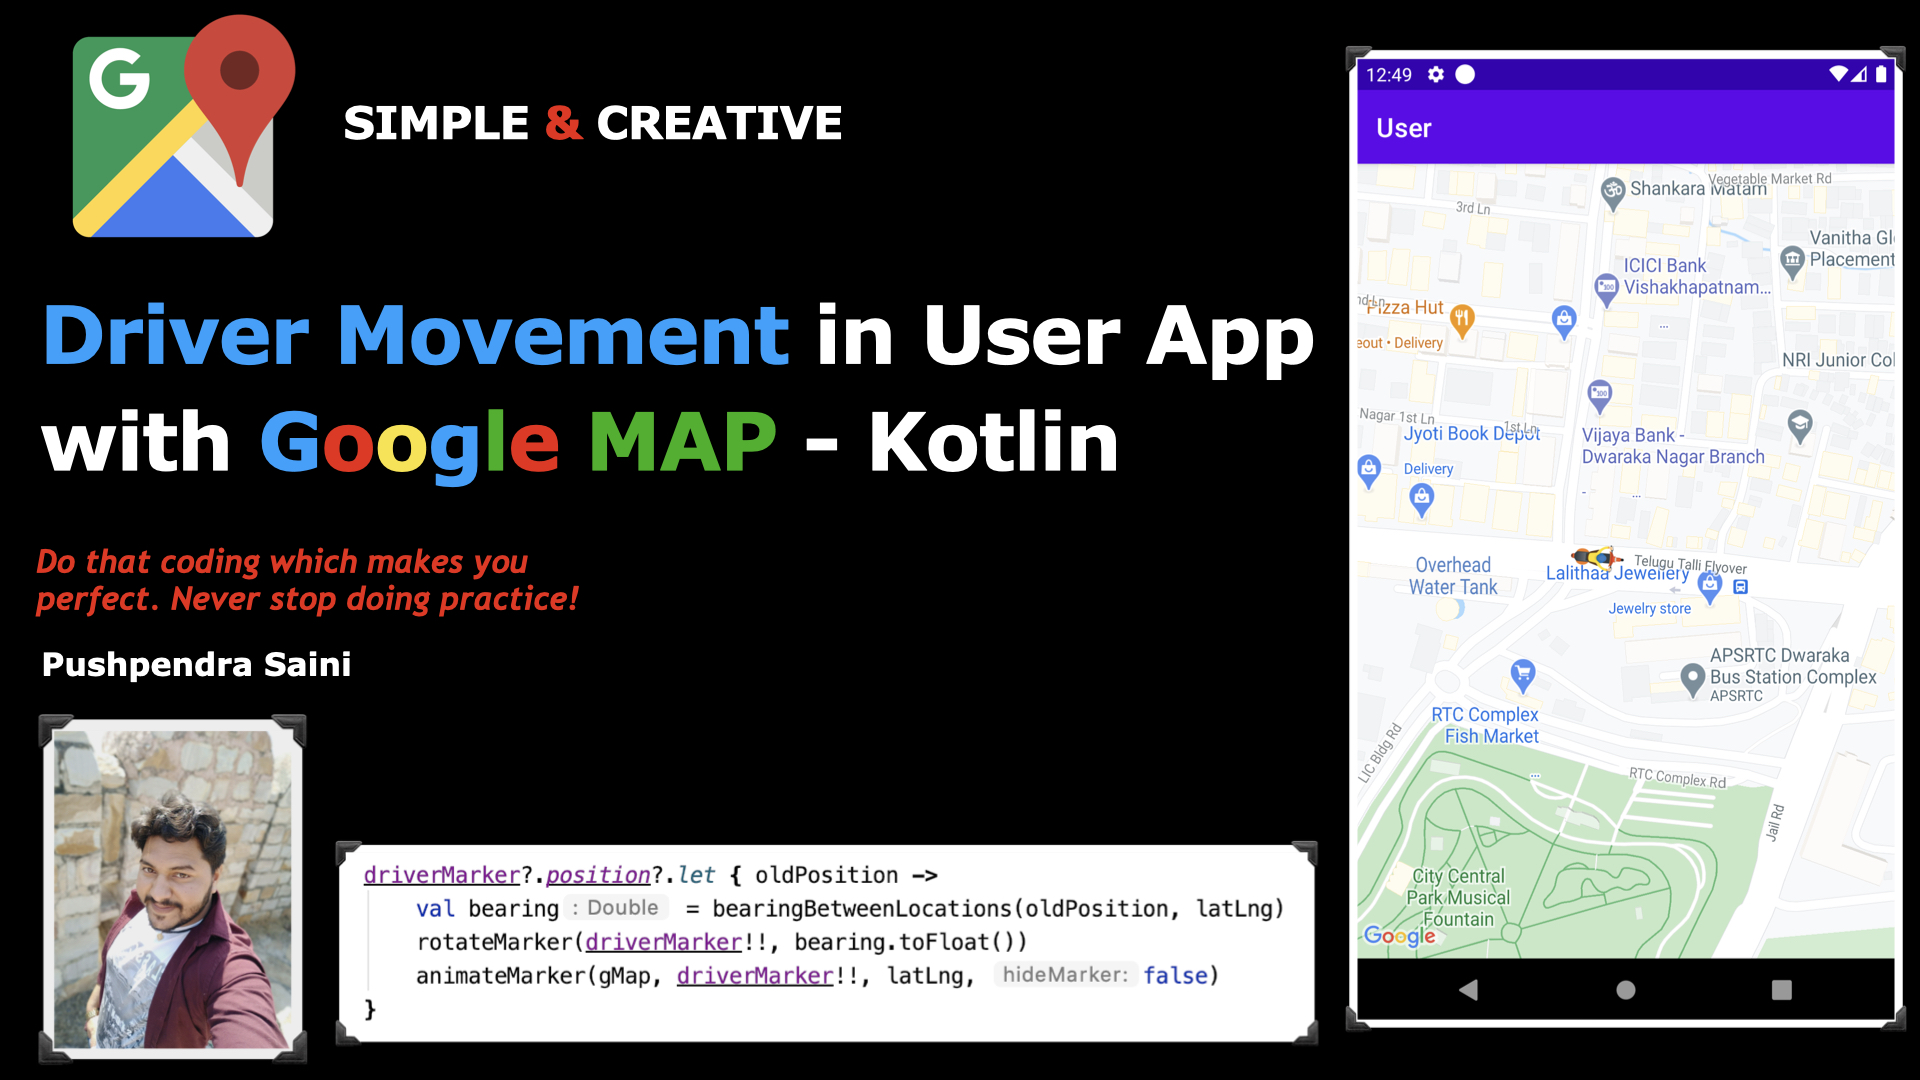
private fun listenLocationOfDriver() {
val dbRef = FirebaseDatabase.getInstance().reference
dbRef.child("driver_points").addValueEventListener(object : ValueEventListener {
override fun onDataChange(snapshot: DataSnapshot) {
Log.d(TAG, "onDataChange: $snapshot")
val value = snapshot.value as HashMap<*, *>
val latitude = (value["latitude"] ?: 0.0).toString().toDouble()
val longitude = (value["longitude"] ?: 0.0).toString().toDouble()
val latLng = LatLng(latitude, longitude)
googleMap?.let { gMap ->
if (driverMarker == null) {
driverMarker = gMap.addMarker(
MarkerOptions()
.position(latLng)
.icon(BitmapDescriptorFactory.fromResource(R.mipmap.ic_driver))
.anchor(0.5f, 0.5f)
.flat(true)
)
} else {
driverMarker?.position?.let { oldPosition ->
val bearing = bearingBetweenLocations(oldPosition, latLng)
rotateMarker(driverMarker!!, bearing.toFloat())
animateMarker(gMap, driverMarker!!, latLng, false)
}
}
gMap.animateCamera(CameraUpdateFactory.newLatLngZoom(latLng, 17.0f))
}
}
override fun onCancelled(error: DatabaseError) {
}
})
}
fun bearingBetweenLocations(latLng1: LatLng, latLng2: LatLng): Double {
val lat1 = latLng1.latitude
val lng1 = latLng1.longitude
val lat2 = latLng2.latitude
val lng2 = latLng2.longitude
val fLat: Double = degreeToRadians(lat1)
val fLong: Double = degreeToRadians(lng1)
val tLat: Double = degreeToRadians(lat2)
val tLong: Double = degreeToRadians(lng2)
val dLon = tLong - fLong
val degree: Double = radiansToDegree(
atan2(
sin(dLon) * cos(tLat),
cos(fLat) * sin(tLat) - sin(fLat) * cos(tLat) * cos(dLon)
)
)
return if (degree >= 0) {
degree
} else {
360 + degree
}
}
private fun degreeToRadians(latLong: Double): Double {
return Math.PI * latLong / 180.0
}
private fun radiansToDegree(latLong: Double): Double {
return latLong * 180.0 / Math.PI
}
internal var isMarkerRotating = false
fun rotateMarker(marker: Marker, toRotation: Float) {
if (!isMarkerRotating) {
val handler = Handler(Looper.getMainLooper())
val start = SystemClock.uptimeMillis()
val startRotation = marker.rotation
val duration: Long = 1000
val interpolator = LinearInterpolator()
handler.post(object : Runnable {
override fun run() {
isMarkerRotating = true
val elapsed = SystemClock.uptimeMillis() - start
val t = interpolator.getInterpolation(elapsed.toFloat() / duration)
val rot = t * toRotation + (1 - t) * startRotation
marker.rotation = if (-rot > 180) rot / 2 else rot
if (t < 1.0) {
handler.postDelayed(this, 16)
} else {
isMarkerRotating = false
}
}
})
}
}
internal var isDriverMarkerMoving = false
fun animateMarker(
googleMap: GoogleMap,
driverMarker: Marker,
toPosition: LatLng,
hideMarker: Boolean
) {
if (!isDriverMarkerMoving) {
val start = SystemClock.uptimeMillis()
val proj = googleMap.projection
val startPoint = proj.toScreenLocation(driverMarker.position)
val startLatLng = proj.fromScreenLocation(startPoint)
val duration: Long = 2000
val interpolator = LinearInterpolator()
val driverMarkerHandler = Handler(Looper.getMainLooper())
driverMarkerHandler.post(object : Runnable {
override fun run() {
isDriverMarkerMoving = true
val elapsed = SystemClock.uptimeMillis() - start
val t = interpolator.getInterpolation(elapsed.toFloat() / duration)
val lng = t * toPosition.longitude + (1 - t) * startLatLng.longitude
val lat = t * toPosition.latitude + (1 - t) * startLatLng.latitude
driverMarker.position = LatLng(lat, lng)
if (t < 1.0) {
driverMarkerHandler.postDelayed(this, 16)
} else {
driverMarker.isVisible = !hideMarker
isDriverMarkerMoving = false
}
}
})
}
}
}
Wonderful, After that in the final step add the Google Map fragment in your MainActivity.kt xml file. As it is mentioned below.
<?xml version="1.0" encoding="utf-8"?>
<androidx.constraintlayout.widget.ConstraintLayout xmlns:android="http://schemas.android.com/apk/res/android"
    xmlns:tools="http://schemas.android.com/tools"
    android:layout_width="match_parent"
    android:layout_height="match_parent"
    tools:context=".MainActivity">

    <fragment
        android:id="@+id/google_map_order_track"
        android:name="com.google.android.gms.maps.SupportMapFragment"
        android:layout_width="match_parent"
        android:layout_height="match_parent" />

</androidx.constraintlayout.widget.ConstraintLayout>
Grate, I hope you have done with it.
In Conclusion, You have done with this tutorial. And I hope now the concept of Driver movement in User Application in Android with Kotlin is clear. Firstly, If you have any doubts regarding the Driver movement in User Application in Android with Kotlin. Then you can comment into the comment box. And If you like this tutorial with a complete description of the simple and attractive tutorial in Android then please like my video on YouTube and do not forget to subscribe to my YouTube channel. Because you will get lots of videos related to android development with very sort tricks.
In addition, If you are more curious about the development and knowing about tutorials then follow the below links


720p izle
I have been reading out a few of your articles and i can claim clever stuff. I will definitely bookmark your site. Melania Augy Alwyn