WepsTech
The world of development
Hello Guys, Welcome to a very interesting tutorial. In this tutorial, I am going to explain to you about the apple authentication in iOS with a swift 5 programming language.
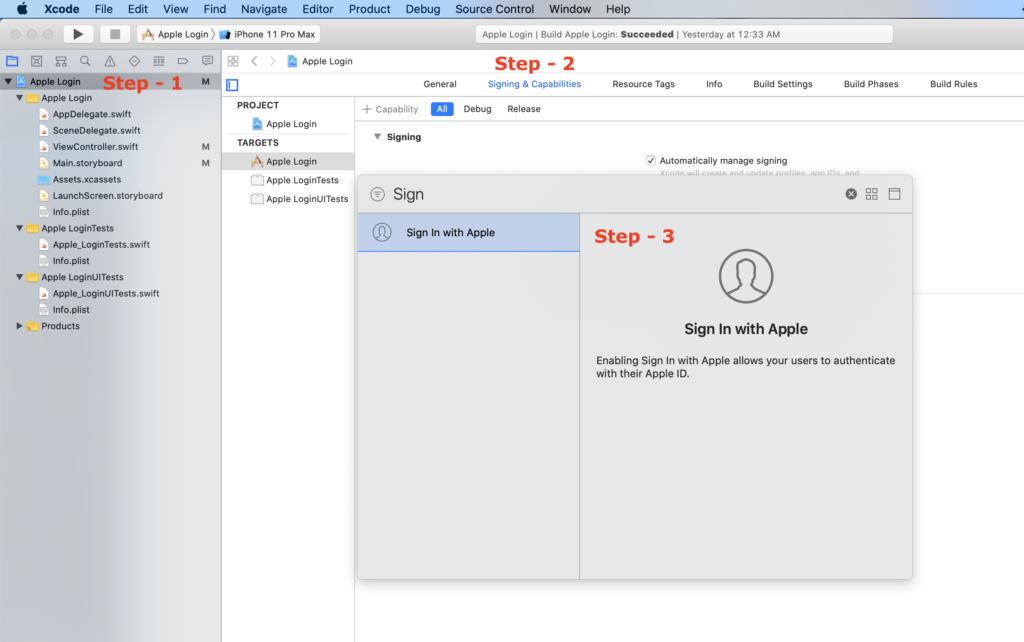
So for starting this tutorial, you must have an Apple ID account. If Yes so let’s move to the development. So at the very first, you need to create a project if you are starting from the beginning. After that, you have to follow the following procedure.

After that, You must have to understand that your Apple ID must have two factor authentication enable. Once it’s done now we will move towards programming.
After doing that you have to write the code first for the apple button. So let’s create button and attach that button to view.
    func configureLoginButton() {
        let button = ASAuthorizationAppleIDButton()
        button.center = view.center
        button.addTarget(self, action: #selector(tapLoginButton), for: .touchUpInside)
        self.view.addSubview(button)
    }
Great job…!! After that, you have to create tapLoginButton() function for the further process.
    @objc func tapLoginButton() {
        let appleIDDetails = ASAuthorizationAppleIDProvider()
        let request = appleIDDetails.createRequest()
        request.requestedScopes = [.email, .fullName]
        let controller = ASAuthorizationController(authorizationRequests: [request])
        controller.delegate = self
        controller.performRequests()
    }
After that, We will create ASAuthorizationControllerDelegate for our controller. So create the below extension in your controller class.
extension ViewController : ASAuthorizationControllerDelegate {
    func authorizationController(controller: ASAuthorizationController, didCompleteWithAuthorization authorization: ASAuthorization) {
        if let details = authorization.credential as? ASAuthorizationAppleIDCredential {
            print("USER ID - \(details.user)")
            print("SELECTED USER NAME - \(details.fullName!)")
            print("USER EMAIL -\(details.email!)")
        }
    }

    func authorizationController(controller: ASAuthorizationController, didCompleteWithError error: Error) {
        print(error.localizedDescription)
    }
}
Great work, Now just call the configureLoginButton() function from the viewDidLoad() of your Controller class. After that you can butyl and you can see the output. But if still you have any doubt then you can visit to my YouTube channel “Pushpendra Saini” and you can watch the video with title Apple Authentication in Swift 5 . I hope this will be very clear for you. No have answer of how to integrate Apple authentication in iOS with swift programming language.
And if all is good then you can go through more important tutorial here.
If you did not subscribe to my YouTube tutorial channel then please subscribe to my YouTube channel and be updated with technology.