WepsTech
The world of development

Hi, In this tutorial you will learn how to integrate Apple Pay in iOS with Swift 5 programming language. Apple Pay has newly released by apple. And here is the complete tutorial for integrating the Apple Pay.
Apple Pay is arguably the best form of payment in an iOS app. It’s easy and efficient for both the user and the developer. Long gone are the days of typing in your credit card info — users can now quickly make transactions through ApplePay and your app should support this service.
Note: To implement Apple Pay, you must have an Apple Developer’s Account. Learn more about the developer’s program.
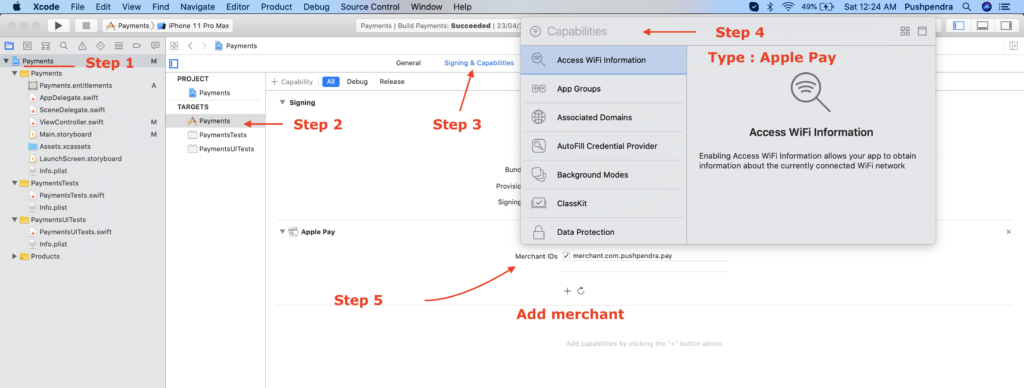
After that, knowing about the required information so let’s move toward to Setup Apple Pay.
After that, follow the below procedure. It is more important for testing as well. Visit on the link https://appstoreconnect.apple.com/access/testers After that follow the below procedure.
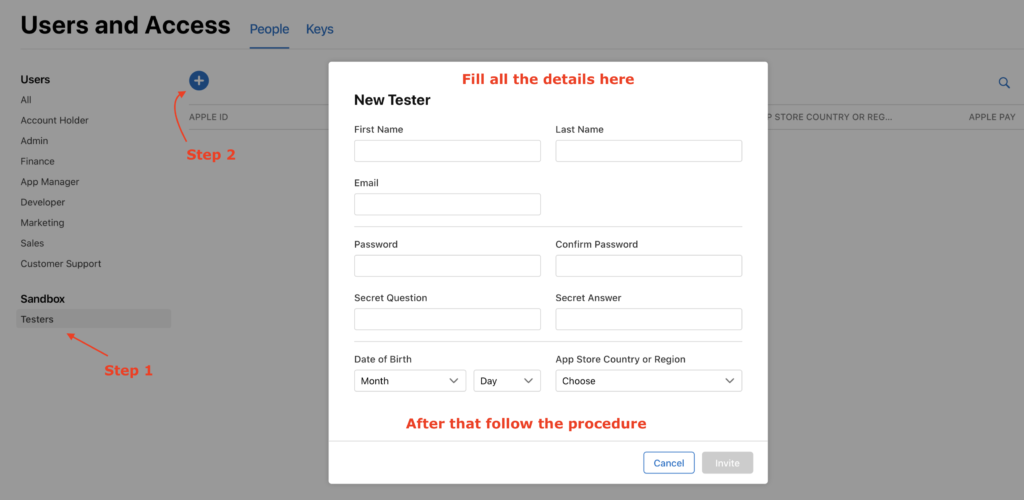
All you have done! After that, Keep in mind if you working with simulator. Then your simulator must sign in with the same apple which you invited above. For more details about it you can visit on the given link.
This is very important phase and very interesting part for Apple Pay. Create local properties
    //MARK:- LOCAL PROPERTIES
    private var paymentRequest : PKPaymentRequest = {
        let request = PKPaymentRequest()
        request.merchantIdentifier = "merchant.com.pushpendra.pay"
        request.supportedNetworks = [.quicPay, .masterCard, .visa]
        request.supportedCountries = ["IN", "US"]
        request.merchantCapabilities = .capability3DS
        request.countryCode = "IN"
        request.currencyCode = "INR"
        request.paymentSummaryItems = [PKPaymentSummaryItem(label: "iPhone XR 128 GB", amount: 123000)]

        return request
    }()
In addition, write the code for opening PKPaymentAuthorizationViewController as shown in video.
    @objc func tapForPay(){
        let controller = PKPaymentAuthorizationViewController(paymentRequest: paymentRequest)
        if controller != nil {
            controller!.delegate = self
            present(controller!, animated: true, completion: nil)
        }
    }
After that, We have to handle delegates of PKPaymentAuthorizationViewController. Now add the following code in your Controller class.
//MARK: - Extension code
extension ViewController : PKPaymentAuthorizationViewControllerDelegate {
    func paymentAuthorizationViewControllerDidFinish(_ controller: PKPaymentAuthorizationViewController) {
        controller.dismiss(animated: true, completion: nil)
    }

    func paymentAuthorizationViewController(_ controller: PKPaymentAuthorizationViewController, didAuthorizePayment payment: PKPayment, handler completion: @escaping (PKPaymentAuthorizationResult) -> Void) {
        completion(PKPaymentAuthorizationResult(status: .success, errors: nil))
    }
}
If you want to make payment as per the user decision then you can use the following code for this purpose.
import UIKit
import PassKit

class ViewController: UIViewController {

    //MARK:- OUTLET PROPERTIES
    @IBOutlet weak var btn_pay: UIButton!
    @IBOutlet weak var textFieldAmount: UITextField!


    //MARK:- LOCAL PROPERTIES

    private var payment : PKPaymentRequest = PKPaymentRequest()
    override func viewDidLoad() {
        super.viewDidLoad()
        self.btn_pay.addTarget(self, action: #selector(tapForPay), for: .touchUpInside)

        payment.merchantIdentifier = "merchant.com.pushpendra.pay"
        payment.supportedNetworks = [.quicPay, .masterCard, .visa]
        payment.supportedCountries = ["IN", "US"]
        payment.merchantCapabilities = .capability3DS
        payment.countryCode = "IN"
        payment.currencyCode = "INR"
    }


    @objc func tapForPay(){
        if !textFieldAmount.text!.isEmpty {
            let amount = textFieldAmount.text!
            payment.paymentSummaryItems = [PKPaymentSummaryItem(label: "iPhone XR 128 GB", amount: NSDecimalNumber(string: amount))]

            let controller = PKPaymentAuthorizationViewController(paymentRequest: payment)
            if controller != nil {
                controller!.delegate = self
                present(controller!, animated: true, completion: nil)
            }
        }
    }
}

extension ViewController : PKPaymentAuthorizationViewControllerDelegate {
    func paymentAuthorizationViewControllerDidFinish(_ controller: PKPaymentAuthorizationViewController) {
        controller.dismiss(animated: true, completion: nil)
    }

    func paymentAuthorizationViewController(_ controller: PKPaymentAuthorizationViewController, didAuthorizePayment payment: PKPayment, handler completion: @escaping (PKPaymentAuthorizationResult) -> Void) {
        completion(PKPaymentAuthorizationResult(status: .success, errors: nil))
    }
}
Good😊😊😊
Great work, In conclusion you have complete it. Now you just need to RUN and enjoy with your output buddy. But if still you are facing any issue for this then you can watch the complete video on Apple Pay in iOS with Swift 5 . And In short, I would like to tell you that, Subscribe my YouTube Channel and below are the more important tutorial links also go through with it so you could be the best and better.